
Finishing the Attack
Finishing the Attack
In order to develop a theme, we need to have the understanding to allow us to recreate the pictures that the players will face during the game. Our practices must look like a snapshot of the game, so we must start at the game and work backwards to create realistic practices. The game is fluid, multi-faceted and no moment is ever exactly recreated. There are, however, the principles of play (which remain constant throughout the many generations of football), movement patterns and triggers, and themes or trends that we can use to make our play more effective (and the opposition’s more predictable, if we wish).
Linking to Finishing the Attack, an example of a principle of play is dispersal, to stretch the opposition’s defensive unit to provide our team with space to play through, around or over. A movement pattern or trigger could be a #9 and #10 working on opposite to each other, so when the #9 stretches the play by threatening in behind, the #10 drops in to receive in the space created. It is these details that allow us to unpick the theme at hand and help us, as coaches, help the players to really understand the game. The theme of Finishing the Attack is something that we will go on to discuss further as we go along.
Tip: Replay a goal and pause it in the build-up; in the case of Finishing the Attack, pause it before the assist pass takes place. What does the picture look like? You should first look at the position of the players when the assist pass is about to be played; note the areas of the pitch, the distance from goal, the numbers of attackers v defenders, the personnel in these positions. Secondly look at the type of pass used for the assist; note the type of pass, the direction and intensity of the pass. Finally look at the movement of the goal-scorer; note where they move from and to, how they move and the timing of their movement, can you notice a trigger that set the run off? Once you have these details you are in a position to recreate this particular goal with realism.
There are some key aspects that we need to consider and understand when looking to coach a team to finish the attack.
Finish the Attack
Firstly, and most obviously, the aim of this phase is to finish the attack, i.e. the attack will be followed up with a break in play; a goal-kick or preferably, a kick-off succeeding a goal being scored. A team is vulnerable to a counter-attack if the play breaks down, or the attack finishes in the goalkeeper’s hands. Your team will have most probably committed numbers forward to increase the effectiveness of the attack, and the last thing you want is the opposition goalkeeper side-winding a 70-yard pass upfront to his rapid, striker team-mate. You must finish the attack. Once your team is clear about this, you can start making more informed decisions about the options they have in front of them; “Do I take this shot and risk a possible counter-attack, or can I work a better opportunity for myself or a team-mate?”
Managing Expectations
As of 09/03/19 68% of Harry Kane’s shots on goals, are on target. 38% of these shots on targets were goals. Sergio Aguero is at 52% Shots on Targets: Shots; 44% Goals: Shots on Target. Roughly, 1 in 2 shots are on target, and 1 in 2 shots on target become goals. Rough maths; these top players require 4 shots to score 1 goal. I know what you are thinking, well it will be difficult to score in the Premier League, well the ratio isn’t that much different between the four professional leagues in England. As of the same date, League 2’s top 10 goal-scorers are averaging 44% goals to shots on target. They show similar ratios to that of the Premier League stars.
This is important to note. It is hard to score goals. If these are the stats that are accurate at the top level, then we should strive for better, but realise that not scoring is part of the process. We can not get frustrated with our players if a shot is off-target, or if a shot-on-target does not result in a goal – it is part of the process. We need to know that, and the players need to know that. They need to know this, so they can manage their emotions when the game is in-play. We need them to be positively focussed on their job, not worrying about hypothetical possibilities (i.e. missing!).
Effective Areas – The Triangle and the Assist Zones
We can agree that there are many ways in which a team can score a goal and we have all seen different types of goals scored in different ways, assisted from different areas. Some shots from distance and some tap-ins, some assisted from multiple passing-sequences and some from a long pass from the goalkeeper. There are many ways to score, but there are some themes that are arising from the modern game. If we understand these themes and pictures, we can provide realism in our practices to support our players in developing their understanding and provide them with opportunities to improve their in-game decision making.
For simplicity, the two areas in which we need to focus on are the “Goal-Scoring Triangle” and the “Assist Zones” – this helps us narrow our focus and start to consider the areas on the pitch in where our practices take place.
The Triangle – see the diagram for the reference points, but unsurprisingly this is where the majority of goals are scored. No shock, it’s really near the goal! Roughly 80%* of goals are scored from this area. So surely 80% of our finishing practices should be stationed in this area too? So that’s the area sorted, but what does the finish look like. Well, to keep it simple: Quick! 60% of the goals scored in this area are scored with 1 touch, 80% are scored with up to 2 touches. Again, not ground-breaking, it might even seem obvious to you, but do our practices encourage this?
* On the 9th March 33 goals were scored in the Premier League, 25 of which were scored within the Triangle. Of these 25, 14 came from the assist zone and 22 were one-touch finishes.
The Assist Zone – see the diagram for the reference points, but if you used the Inside Channel as a reference point you will not go to far wrong. This area is one of the most dangerous and productive areas when finishing the attack. Most goals scored form within the triangle come from an assist in this area. If this is one of the most dangerous areas, we need to be ensuring our finishing practices are including this space; build up play breaking into this area and assists passes coming out of this area. A pass from this area can be much more effective than a cross from the outside channel – think about it, its over a shorter distance for one thing, so the likelihood of the pass arriving with more quality and accuracy is higher.
So now we know about these two areas, we need to understand:
What do the Assist Passes from these zones look like? What should we be practicing?
How do teams break into these assist zones? What should be practicing?

Designing Practice
When designing practice, before we start to plan the size, shape, area, numbers – we need to be clear on what our intended outcomes are. I have shared below three practices below, working across the variety of the practice spectrum, to demonstrate how you can incorporate this information we have explored, into developing the individual, unit and team.
Each practice has a clear and specific intention – and as with all practices there is a trade-off; you may get more of one aspect than you do another, e.g. to increase repetition of action, you may decrease the decision-making processes involved.
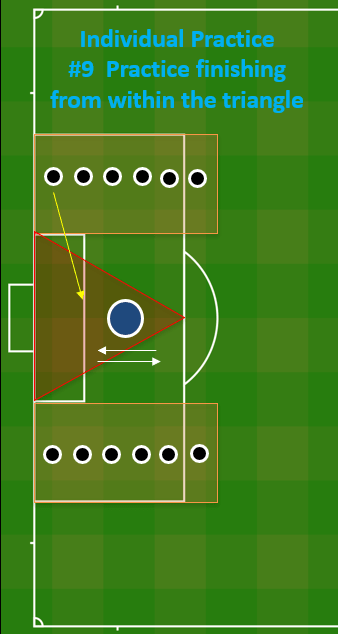
Individual Practice
You may be working with the forward player(s) in an individual practice; limited numbers but position specific work. A simple practice to provide repetition without repetition. What I mean by this is that the player will get high levels of repetition of finishing from within the triangle, but no two finishes will be the same – just like in the game.
You could use a Goalkeeper, if available, and another forward player as servers (ideally a #7 or #11, and/or #8 or #10).
Ensure that servers run onto the ball, to provide the #9 opportunity to try to read the body shape of the server and predict the flight and trajectory of the ball.
Ensure that the #9 practices his movement so that they come onto the ball.
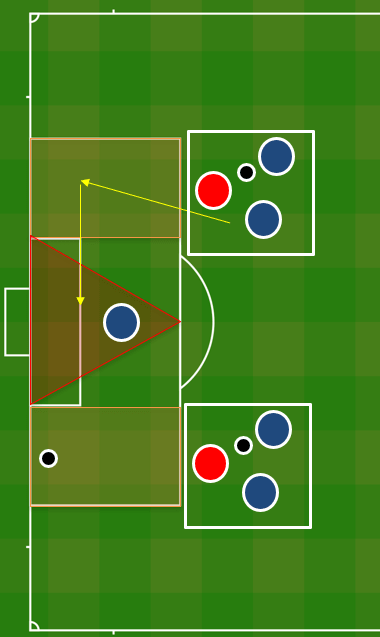
Unit Practice
A simple practice to include the practicing ways to break into the assist zone can be seen here. In this practice, we have setup a moment outside of the area, which will allow the coach to replicate different ways in which a player can break into the assist zone. Once the play is in the assist zone, the detail as above is relevant.
We have made the box opposed (i.e. put a defender in) to ensure the speed of play is that realistic to the game. The numbers can be changed, so for example, you could include the #7, #2 and #8 (or #10) (based on attacking down the RHS of the pitch) against one defender. To add realism, you could have the opposite side #11 and #8 (or #10) arriving into the triangle to provide an overload. Ways in which to break into the assist zone include, but are not limited to:
The #7 (or #11) driving in, having received the ball OUTSIDE of the full-back
The #7 (or #11) starting OUTSIDE of the full-back, receiving a penetrating pass between centre-back and full-back
The #8 (or #10) running beyond the defensive unit, between the centre-back and full-back
The #2 (or #3) over-lapping run, after the #7 (or #11) drives inside
A diagonal ball from the #8 or #10 into the opposite assist zone for the #7 or #11 to run onto
Team Practice
A simple setup for a Phase of Play (assuming you are playing in a 1-4-3-3 (point down, i.e. a deep-lying #4 and more attacking #8 and #10) against a 1-4-3-3 (point up, i.e. two deep-lying midfielders / or 1-4-2-3-1). Some considerations to practice design:
Include your #2 and #3 to increase the opportunity for combinations between these and the wide-forwards
Provide opposition goals, higher up the pitch, to encourage the reds to get out of their defensive third and set realistic positions to attack.
Ensure offside is upheld, to provide realism!
Ensure the defenders, defend with realism. A scenario or challenge is an effective way of encouraging this.
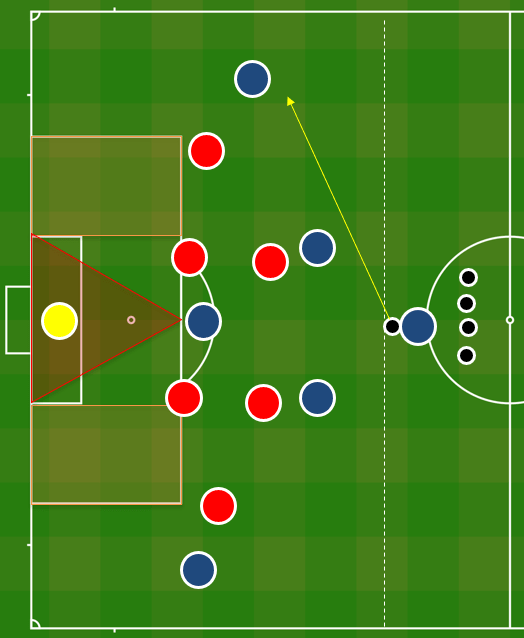
Some principles for the attacking team:
Always look to play forward first!
Receive the ball so you can play forward on your first touch.
Maintain a high ball speed – if you can not play forward, keep the ball moving horizontally with speed and accuracy to draw and tempt the opposition. Be patient and manage emotions, keep the ball (and the opposition moving).
Remember we are looking to play into the assist zone, as this is a dangerous area BUT if we can bypass this and play direct into the #9….do so.